作为程序员,我们经常做的一个事情就是“面向搜索引擎编程”。通过搜索引擎,我们能从各种官方文档、博客、问答论坛上找到问题的解决办法,或者学到我们感兴趣的技术。其中博客是一个重要的知识来源,有很多成熟的博客网站,如Github、CSDN、简书等,可以供大家在上面发布自己的博客。程序员写博客有以下的好处:
总结日常所学知识,点滴积累,形成自己的财富。
分享自己的经验和方法,为其他人提供帮助。
通过写文章,完成对一个事情的分析和梳理,锻炼自己解决问题的能力。
和网络上的其他人进行思想的碰撞,结识朋友、共同提升。
我从很久以前就一直想开始博客的写作,但是因为各种原因迟迟无法实施。直到现在,感觉自己在过去工作过程中遇到的很多问题没有积累下来,极大地影响了自己的知识体系构建和未来的发展。事不宜迟,迟则有变,于是决定速战速决,立刻上手博客的写作。
在决定开始写博客的时候,我在三种方案之间犹豫:
在成熟的博客网站上注册账户,直接写作。优点是SEO排名靠前、操作简单、网站认可度高。
使用成熟的博客框架搭建博客。优点是搭建简单、可以一定程度DIY。
用自己所学技术亲手搭建。优点是能锻炼自己能力、自由度极高。
以上三种方案,各有利弊,经过最终的抉择,我还是决定执行方案3——动手一步一步搭建自己的专属博客,这样既能检验自己所学,本身也是一个实战的过程,在后续的博客运维和开发中还能继续学习和应用到更多的技术。总结下来就是一个字:酷!
那么接下来进入主题,本文将讲述自己一步一步将博客建设起来的过程,同时本文也是博客建设好以后的第一篇文章。有一种鸡生蛋、蛋生鸡的味道。😂
在开始阶段,我需要明确自己搭建博客需要做哪些准备工作,以及接下来的搭建流程。
首先,需要有一个运行自己博客系统的环境。现在的互联网,一切都在云上,各大公司为我们提供的云服务器,能很好地满足我们的需求。我刚好有两年前买的一台特价的阿里云1核1G云服务器,闲置到现在终于能排上用场了。
博客系统运行起来以后,为了能更好地让互联网用户访问,有一个简短易记的域名是必不可少的。大学时候,我给自己注册了一个域名:qzy.im,虽然不是主流的根域名,但是特别能突出域名的特有性。qzy是我的名字首字母,im表示“我是...”的意思,简短清晰,用来建设自己的个人博客再适合不过了。
另外为了博客的稳定访问,域名最好经过工信部备案,持证上岗的域名才是好域名。
有了服务器和域名,接下来我就可以专注于系统的开发了。开发一个完整的系统,必须同时具备前后端的技能,需要独立完成前后端的开发、测试,尽可能保证系统的功能性。这也是整个博客建设过程中最耗时、最核心的部分,同时,这一部分也能很好地检验自己过去所学的技能,还能学习到很多新的技能。
由于博客是独立完成,那么在开发过程中以及开发完成之后,自己还需要对系统进行测试。包括很多方面:功能、安全、性能等,这些都将影响博客的稳定运行。
系统开发完成,接下来就可以进行部署和发布。在这一部分,需要具备服务器操作的技能、以及一些软件的使用和配置能力。
完成发布后,我的个人博客就能正式开放访问了。同时,我也正式迈出了自己在博客写作之路上的第一步。
下面是我准备在博客建设过程中用到的技术和工具:
阶段
分类
技术、平台或工具
版本
备注
开发和测试
操作系统
Windows
10
IDE
Eclipse
2019-12 (4.14.0)
后端开发
HBuilder X
2.5.1.20190103
前端开发
开发语言
Java
1.8.0_221
HTML5 + CSS3 + ES6
技术或框架
Spring MVC
5.2.3.RELEASE
Spring Boot
2.2.4.RELEASE
Spring Data JPA
数据持久化
Thymeleaf
模版渲染引擎
Liquibase
3.8.5
数据库重构和迁移
jQuery
3.4.1
Font Awesome
5.7.0
网页图标字体库
CodeMirror
5.52.0
在线代码编辑器
数据库
MySQL
8.0
MySQL Workbench
8.0.17
数据库管理
调试工具
Postman
7.16.0
接口调试
Chrome
77.0.3865.120
网页调试
部署和发布
操作系统
CentOS
7.3
1核CPU;1G内存
数据库
MySQL
5.7.24
Web服务器
Nginx
1.12.2
提供静态资源和反向代理功能
SSH客户端
PuTTY
0.72
服务器远程连接
FTP客户端
FileZilla
3.45.1
服务器文件管理
博客写作
语言
Markdown
工具
Typora
0.9.85
使用Markdown编写文章
在技术和工具选型阶段,正常情况应该针对某个类型的多种备选方案进行对比,但是实际过程中大多的选择都是基于习惯。例如开发过程的IDE和语言选择,都是按照个人习惯来确定的。除此之外还有其他的一些需要特别提到的地方:
HTML5 + CSS3 + ES6:前端开发用到的语言HTML5 + CSS3 + ES6是基于最新的稳定标准,其中会使用了一些最新的语法和特性,这就会导致网页在各种浏览器之间的兼容性不好。例如我在JavaScript中会大量使用模版字符串或者用class关键字定义类,那么IE浏览器或者一些非主流浏览器中就不兼容。但是,考虑到未来将要访问我个人博客的人应该主要集中于软件技术领域,所以我就放弃了对这些浏览器的兼容。
Spring Data JPA:数据持久化选用Spring Data JPA主要是看中它的简洁,在数据库操作中屏蔽很多复杂的操作,能让我的精力主要集中在功能开发中,加快博客的建设。
Thymeleaf:使用Thymeleaf模版渲染引擎的目的,是为了将博客做成静态化的。静态化的网页有助于SEO,能够提升网站在搜索引擎中的排行,同时借助浏览器缓存、Nginx缓存或CDN等功能,能很好地提升网站的访问速度。通过Thymeleaf,我可以将博客里各种页面的格式编辑成模版,然后预渲染成静态网页,最后通过Nginx直接提供静态资源的访问。
Font Awesome :它是一个简洁清晰的网页图标字体库。在我的个人博客中,我主要会采取简洁清爽的网页风格,避免网页上穿插很多图片,这不仅影响访问速度,还会导致浏览网页的人注意力被分散。我希望访问博客的人能专注于文章内容、认可我的文章,进而对我的博客增加关注度。因此,我的博客中会尽可能只有文字和一些简洁明了的指示性图标,因此,我选择了Font Awesome。CodeMirror :这是一个能够在网页中提供在线编辑和展示代码功能的库。程序员的博客文章经常需要展示代码,CodeMirror能够支持上百种语言的高亮展示,同时还有丰富的主题,简单易用,样式也很美观。各种浏览器:开发和测试过程我将主要使用Chrome作为网页调试工具,原因是它的快速和功能完整。但是实际上为了保证网页在各种浏览器中的样式一致和兼容性,我还会用到Firefox、Edge、Safari、QQ浏览器等浏览器来测试我的网页。
服务器和数据库:服务器我购买的是阿里云的一个普通配置的ECS,数据库我选择自行在ECS中搭建。原因有二:一是可以学习Linux系统上的数据库安装、配置和运维;二是没钱……😂基于第二点原因,虽然RDS等数据库服务能提供更加稳定的服务,并且能够减少自己的运维工作,但我还是放弃了购买数据库。实际上,作为爱折腾、爱钻研的一个软件工程师,这些工作也能让我学习到很多经验,对自己也是一份宝贵的财富。
Typora 和Markdown:我的博客页面风格定义为简洁清爽,有一个美观简洁的文章内容编辑工具也是必不可少的。Markdown相比其他富文本编辑,语法十分简单,并且最后写成的文章也很易于阅读。而Typora是一款流畅、功能强大的Markdown编辑器,由于它能够很好地对各种不同语言的代码块进行着色,所以很适合程序员写文章。用它写成的文章样式美观清晰,它同时还支持HTML标签,对于有HTML和CSS基础的写作者来说也非常灵活和方便。
综合以上考虑和对比,我最终决定使用Spring Boot、Spring Data JPA、Liquibase、MySQL及一些其他能够集成的框架来进行博客后端开发;使用Thymeleaf、jQuery、Font Awesome、CodeMirror等组件进行博客前端开发;使用Markdown语言和Typora软件进行博客文章写作。最后,利用Nginx及其他工具将静态资源和后端服务发布到服务器上,完成博客的整体搭建。
选择好建设博客需要使用的技术和工具以后,就可以开始专注地开发了。为了追求博客的尽快发布,我在前后端的开发中会尽可能从简,先只开发最基础的功能,后续博客建成以后再逐步完善。在代码量上也会尽可能精简,多更新、多迭代,运用敏捷开发思维完成博客的建设。
在博客功能方面,本次开发只完成必要的基础功能,包括:
文章查看
评论文章
回复其他用户的评论
被其他用户回复时系统发送邮件提醒
设定好以上目标后,接下来进行正式开发。
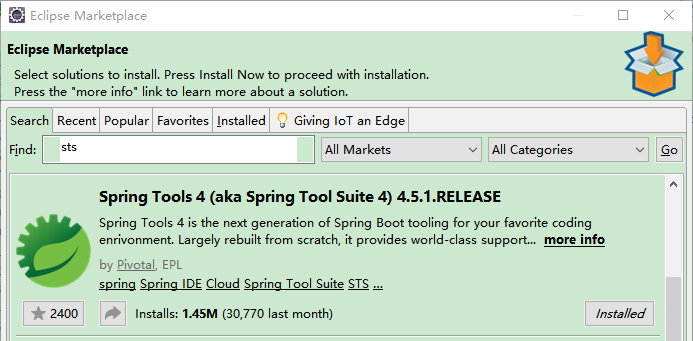
在这之前我已经在Eclipse中安装了Spring Tools,这是一个可以在IDE中高效开发Spring Boot项目的工具,通过菜单Help→Eclipse Marketplace→搜索sts即可找到这个工具并安装:
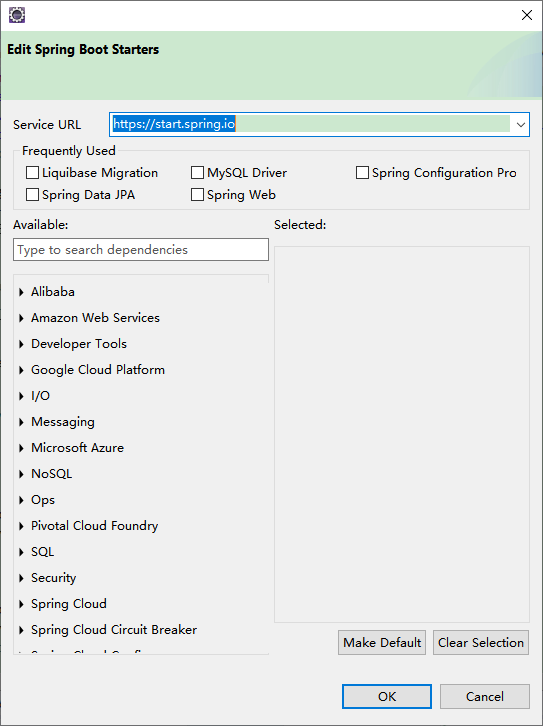
然后通过菜单File→New→Other→Spring Boot→Spring Starter Project来创建一个Spring Boot项目,创建项目时可以选择一些自己能够用到的依赖组件:
我创建好项目以后的pom.xml文件如下:
<?xml version="1.0" encoding="UTF-8"?>
<project xmlns="http://maven.apache.org/POM/4.0.0"
xmlns:xsi="http://www.w3.org/2001/XMLSchema-instance"
xsi:schemaLocation="http://maven.apache.org/POM/4.0.0 https://maven.apache.org/xsd/maven-4.0.0.xsd">
<modelVersion>4.0.0</modelVersion>
<parent>
<groupId>org.springframework.boot</groupId>
<artifactId>spring-boot-starter-parent</artifactId>
<version>2.2.4.RELEASE</version>
<relativePath /> <!-- lookup parent from repository -->
</parent>
<groupId>im.qzy</groupId>
<artifactId>blog</artifactId>
<version>0.0.1-SNAPSHOT</version>
<name>blog</name>
<description>Demo project for Spring Boot</description>
<properties>
<java.version>1.8</java.version>
</properties>
<dependencies>
<dependency>
<groupId>im.qzy.q</groupId>
<artifactId>q-web</artifactId>
<version>0.0.1-SNAPSHOT</version>
</dependency>
<dependency>
<groupId>org.springframework.boot</groupId>
<artifactId>spring-boot-configuration-processor</artifactId>
<optional>true</optional>
</dependency>
<!-- https://mvnrepository.com/artifact/org.jsoup/jsoup -->
<dependency>
<groupId>org.jsoup</groupId>
<artifactId>jsoup</artifactId>
<version>1.13.1</version>
</dependency>
</dependencies>
<build>
<plugins>
<plugin>
<groupId>org.springframework.boot</groupId>
<artifactId>spring-boot-maven-plugin</artifactId>
</plugin>
</plugins>
</build>
</project>
在这个项目中,我并没有直接引用Spring Data JPA、Thymeleaf等组件,而是引用了我自己封装的一个包:
<groupId>im.qzy.q</groupId>
<artifactId>q-web</artifactId>
<version>0.0.1-SNAPSHOT</version>
这个包中集成了我自己常用的各种组件,例如Spring Data JPA、Thymeleaf、Spring Boot DevTools、Java Mail Sender、Liquibase Migration、MySQL Driver等。另外我还自己定义了一系列能够简化Web开发的工具和模块,例如:
封装统一格式的响应结果,包括响应码、响应消息和响应数据。
定义请求上下文和会话上下文,便于系统内部随时随地共享当前请求和会话数据。
封装了一些通用的异常处理,并合理地包装成响应结果返回给前端。
通过配置文件可以定义全局统一时区,包括Java进程、MySQL连接以及Jackson序列化反序列化中的时区。
定义了一些通用的Web过滤器,对请求、会话进行全局过滤和处理。
定义了一些常用的模块,例如邮件发送、短信发送、自定义缓存等。
定义了一些常用的工具,例如文件处理、加密解密、时间转换、Java类型处理等。
基于这个包,我接下来就可以用很少量的代码完成博客系统后端部分的开发,同时也能够极大地缩短开发时间。
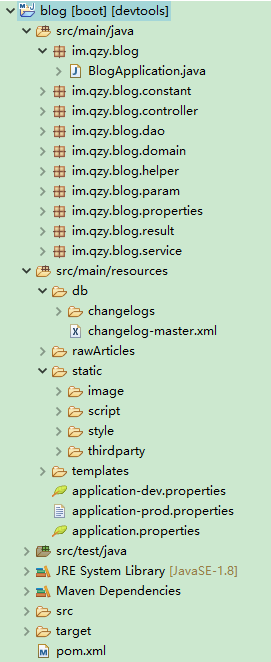
新项目创建好后,需要在项目中划分好目录和结构,并创建一些必要的文件,我调整以后的项目结构如下:
其中,src/main/java 中各部分的功能划分为:
BlogApplication.java 是Spring Boot项目的启动文件。constant 包用来存放系统中的一些常量,例如业务的错误响应码、模板文件名以及其他的全局常量等。controller 包中是控制层代码,负责接收前端请求并返回结果。dao 包中是持久层代码,负责操作数据库。domain 包中是系统中定义的各种DO、DTO、VO等分层领域模型。helper 包中是一些内部通用模块,多数承担工具职责。param 包中是请求数据的封装类,用于控制层接收前端请求。properties 包中是系统的一些配置属性类,从.properties文件中读取各种属性,供其他组件访问。result 包中是响应数据的封装类,与 param 包对应,用于控制层给前端返回响应。service 包中是服务层代码,负责具体的业务逻辑。
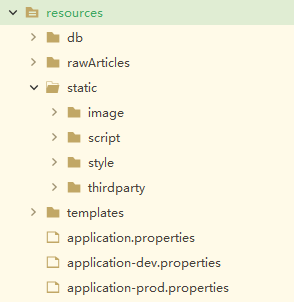
src/main/resources 中各部分的功能划分为:
db 目录用来存放Liquibase相关的文件,changelogs 目录用来存放数据库.sql文件,change-master.xml 是Liquibase的配置文件。rawArticles 目录用来存放博客文章中的一些原始资源文件,例如图片、附件等。static 目录用来存放前端的静态资源文件,其中 image 存放图片,script 存放脚本,style 存放样式,thirdparty 存放第三方的一些库。templates 目录用来存放HTML模板文件,包括页面模板以及邮件模板等。application.properties、application-dev.properties、application-prod.properties 文件都是项目的配置文件,分别对应通用配置、开发环境配置(dev)和产品环境配置(prod)。
pom.xml 文件是项目的Maven配置文件,在创建一个Spring Boot项目 中已经提到。
以上项目结构主要是遵循后端开发过程中的分层和模块化理念,另外还有一些个人习惯。在平常的开发中,有一个相对明确的项目结构划分能很好地理清开发思路、提升开发效率。
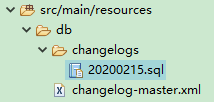
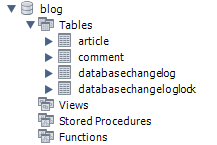
接下来,用MySQL Workbench创建一个名为blog的数据库,然后在 db/changelogs 目录下新建一个.sql文件:
这个.sql文件的内容为:
--liquibase formatted sql
--changeset qzy:1
CREATE TABLE `article` (
`id` int(10) unsigned NOT NULL AUTO_INCREMENT,
`title` varchar(45) NOT NULL COMMENT '标题',
`english_title` varchar(100) NOT NULL COMMENT '英文标题',
`tags` varchar(1000) NOT NULL COMMENT '标签',
`content_file` varchar(1000) NOT NULL COMMENT '正文内容所在文件',
`view_count` int(11) NOT NULL COMMENT '浏览数',
`gmt_create` datetime NOT NULL,
`gmt_modified` datetime DEFAULT NULL,
PRIMARY KEY (`id`)
) ENGINE=InnoDB DEFAULT CHARSET=utf8 COMMENT='文章';
--changeset qzy:2
CREATE TABLE `comment` (
`id` int(10) unsigned NOT NULL AUTO_INCREMENT,
`article_id` int(11) NOT NULL COMMENT '文章id',
`root_id` int(11) DEFAULT NULL COMMENT '顶级评论id',
`parent_id` int(11) DEFAULT NULL COMMENT '上级评论id',
`from_author` tinyint(1) NOT NULL DEFAULT '0' COMMENT '作者评论',
`email` varchar(100) DEFAULT NULL COMMENT '电子邮箱',
`content` varchar(1000) NOT NULL COMMENT '内容',
`gmt_create` datetime NOT NULL,
`gmt_modified` datetime DEFAULT NULL,
PRIMARY KEY (`id`),
KEY `idx_article_id` (`article_id`),
KEY `idx_parent_id` (`parent_id`),
KEY `idx_root_id` (`root_id`)
) ENGINE=InnoDB DEFAULT CHARSET=utf8 COMMENT='评论';
其中两条sql语句分别对应文章表和评论表的创建。然后在 change-master.xml 中添加该.sql文件:
<?xml version="1.0" encoding="UTF-8"?>
<databaseChangeLog
xmlns="http://www.liquibase.org/xml/ns/dbchangelog"
xmlns:xsi="http://www.w3.org/2001/XMLSchema-instance"
xsi:schemaLocation="http://www.liquibase.org/xml/ns/dbchangelog http://www.liquibase.org/xml/ns/dbchangelog/dbchangelog-3.6.xsd">
<include file="changelogs/20200215.sql" relativeToChangelogFile="true" />
</databaseChangeLog>
由于Liquibase默认的配置文件路径为 classpath:/db/changelog/db.changelog-master.yaml,在这里我需要在 application.properties 中指定配置文件路径:
spring.liquibase.change-log=classpath:/db/changelog-master.xml
接下来在 domain 包中分别创建文章和评论的实体类:
@Entity
@Table(name = "article")
public class ArticleDO extends BaseDO {
private String title;
private String englishTitle;
private String tags;
private String contentFile;
private Integer viewCount;
}
@Entity
@Table(name = "comment")
public class CommentDO extends BaseDO {
private Long articleId;
private Long rootId;
private Long parentId;
private Boolean fromAuthor;
private String email;
private String content;
}
上面代码省略了getter和setter,这两个类都继承了一个我在 q-web 包中自己定义的基础类 BaseDO,其中包括一些公共的字段,例如 id、gmtCreate、gmtModified 等。
以上操作完成后,在 application-dev.properties 文件中配置好数据库连接:
spring.datasource.driver-class-name=com.mysql.cj.jdbc.Driver
spring.datasource.url=jdbc:mysql://localhost:3306/blog?characterEncoding=UTF-8
spring.datasource.username=<数据库用户名>
spring.datasource.password=<数据库密码>
最后运行 BlogApplication.java 类,并指定dev配置文件,程序运行成功后数据库表就自动创建好了:
由于文章的标题、标签、内容等信息在文章发布后几乎不会更新,所以我打算以静态网页形式在前端展示这些信息,后端就只需要提供一些动态数据的更新和查询接口:
记录文章查看数:article/view
获取文章统计信息(如查看数以及评论数):article/getStatisticsInfo
所以控制层、服务层和持久层的代码也很简单,分别定义以下类或接口:
在 controller 包中定义 ArticleController 类
在 service 包中定义 ArticleService 类
在 dao 包中定义 ArticleRepository 和 CommentRepository 接口
在 constant、param、result 包中分别定义相关的一些常量、参数类和结果类
其中主要的一些代码如下:
package im.qzy.blog.controller;
import javax.validation.Valid;
import org.springframework.beans.factory.annotation.Autowired;
import org.springframework.web.bind.annotation.GetMapping;
import org.springframework.web.bind.annotation.PostMapping;
import org.springframework.web.bind.annotation.RequestMapping;
import org.springframework.web.bind.annotation.RestController;
import im.qzy.blog.service.ArticleService;
import im.qzy.q.qweb.controller.BaseController;
import im.qzy.q.qweb.param.IdParam;
@RestController
@RequestMapping("article")
public class ArticleController extends BaseController {
@Autowired
private ArticleService articleService;
@PostMapping("view")
public void view(@Valid IdParam param) {
articleService.view(param);
}
@GetMapping("getStatisticsInfo")
public Object getStatisticsInfo(@Valid IdParam param) {
return articleService.getStatisticsInfo(param);
}
}
package im.qzy.blog.service;
import org.springframework.beans.factory.annotation.Autowired;
import org.springframework.stereotype.Service;
import im.qzy.blog.constant.FailCodeConstant;
import im.qzy.blog.dao.ArticleRepository;
import im.qzy.blog.dao.CommentRepository;
import im.qzy.blog.domain.ArticleDO;
import im.qzy.blog.result.ArticleGetStatisticsInfoResult;
import im.qzy.q.qweb.param.IdParam;
import im.qzy.q.qweb.service.BaseService;
@Service
public class ArticleService extends BaseService {
@Autowired
private ArticleRepository articleRepository;
@Autowired
private CommentRepository commentRepository;
public void view(IdParam param) {
if (!articleRepository.existsById(param.getId())) {
fail(FailCodeConstant.Article.NOT_EXISTED, "文章不存在");
}
articleRepository.addViewCountById(param.getId(), 1);
}
public ArticleGetStatisticsInfoResult getStatisticsInfo(IdParam param) {
ArticleDO article = articleRepository.findById(param.getId())
.orElseThrow(() -> {
return failException(FailCodeConstant.Article.NOT_EXISTED, "文章不存在");
});
ArticleGetStatisticsInfoResult result = new ArticleGetStatisticsInfoResult();
result.setViewCount(article.getViewCount());
result.setCommentCount(commentRepository.countByArticleId(article.getId()));
return result;
}
}
package im.qzy.blog.dao;
import javax.transaction.Transactional;
import org.springframework.data.jpa.repository.Modifying;
import org.springframework.data.jpa.repository.Query;
import org.springframework.stereotype.Repository;
import im.qzy.blog.domain.ArticleDO;
import im.qzy.q.qweb.dao.BaseRepository;
@Repository
public interface ArticleRepository extends BaseRepository<ArticleDO> {
@Transactional
@Modifying
@Query("UPDATE ArticleDO SET view_count = view_count + :increment WHERE id = :id")
void addViewCountById(long id, int increment);
}
package im.qzy.blog.dao;
import org.springframework.stereotype.Repository;
import im.qzy.blog.domain.CommentDO;
import im.qzy.q.qweb.dao.BaseRepository;
@Repository
public interface CommentRepository extends BaseRepository<CommentDO> {
int countByArticleId(long articleId);
}
上面这些类或接口中引用了一些我在 q-web 中定义的基础类或接口,如 BaseController、BaseService、BaseRepository 等,其中包括一些通用方法和属性的包装。例如 ArticleService 中第22行的 fail(int code, String message) 方法会将响应码和响应消息自动包装成一个 FailException 异常并抛出,这个异常被 q-web 包中的异常处理组件捕获,会被转换成统一格式的响应结果返回给前端。基于这些封装好的功能和组件,上面所示的代码才能相对简单,同时也方便快速开发,让自己的思维能集中到具体的业务逻辑中。
评论部分的功能也比较简单,只包括评论的添加和展示,具体为下面两个接口:
获取评论树:comment/getTree
发表新评论:comment/add
对应地,需要新增以下类:
在 controller 包中定义 CommentController 类
在 service 包中定义 CommentService 类
在 constant、param、result 包中分别定义相关的一些常量、参数类和结果类
其中主要的一些代码如下:
package im.qzy.blog.controller;
import javax.validation.Valid;
import org.springframework.beans.factory.annotation.Autowired;
import org.springframework.web.bind.annotation.GetMapping;
import org.springframework.web.bind.annotation.PostMapping;
import org.springframework.web.bind.annotation.RequestMapping;
import org.springframework.web.bind.annotation.RestController;
import im.qzy.blog.param.CommentAddParam;
import im.qzy.blog.param.CommentGetTreeParam;
import im.qzy.blog.service.CommentService;
import im.qzy.q.qweb.controller.BaseController;
@RestController
@RequestMapping("comment")
public class CommentController extends BaseController {
@Autowired
private CommentService commentService;
@GetMapping("getTree")
public Object getTree(@Valid CommentGetTreeParam param) {
return commentService.getTree(param);
}
@PostMapping("add")
public Object add(@Valid CommentAddParam param) {
return commentService.add(param);
}
}
package im.qzy.blog.service;
import java.util.ArrayList;
import java.util.Date;
import java.util.HashMap;
import java.util.List;
import java.util.Map;
import javax.transaction.Transactional;
import org.springframework.beans.factory.annotation.Autowired;
import org.springframework.data.domain.Sort;
import org.springframework.stereotype.Service;
import im.qzy.blog.constant.FailCodeConstant;
import im.qzy.blog.constant.TemplateConstant;
import im.qzy.blog.dao.ArticleRepository;
import im.qzy.blog.dao.CommentRepository;
import im.qzy.blog.domain.ArticleDO;
import im.qzy.blog.domain.CommentDO;
import im.qzy.blog.helper.ArticleHelper;
import im.qzy.blog.param.CommentAddParam;
import im.qzy.blog.param.CommentGetTreeParam;
import im.qzy.blog.properties.BlogProperties;
import im.qzy.blog.result.CommentAddResult;
import im.qzy.blog.result.CommentGetTreeResult;
import im.qzy.q.qweb.helper.QMailHelper;
import im.qzy.q.qweb.helper.QMailHelper.QMailMessage;
import im.qzy.q.qweb.service.BaseService;
@Service
public class CommentService extends BaseService {
@Autowired
private CommentRepository commentRepository;
@Autowired
private ArticleRepository articleRepository;
@Autowired
private QMailHelper qMailHelper;
@Autowired
private ArticleHelper articleHelper;
@Autowired
private BlogProperties blogProperties;
public CommentGetTreeResult getTree(CommentGetTreeParam param) {
Map<Long, CommentGetTreeResult.Item> map = new HashMap<>();
List<CommentGetTreeResult.Item> list = new ArrayList<>();
List<CommentDO> comments = commentRepository.findByArticleId(param.getArticleId(), Sort.unsorted());
for (CommentDO comment : comments) {
CommentGetTreeResult.Item item = new CommentGetTreeResult.Item();
item.setId(comment.getId());
item.setFromAuthor(comment.getFromAuthor());
item.setContent(comment.getContent());
item.setGmtCreate(comment.getGmtCreate());
item.setSubList(new ArrayList<>());
map.put(item.getId(), item);
if (comment.getParentId() == null) {
list.add(item);
} else {
map.get(comment.getParentId()).getSubList().add(item);
}
}
CommentGetTreeResult result = new CommentGetTreeResult();
result.setList(list);
return result;
}
@Transactional
public CommentAddResult add(CommentAddParam param) {
ArticleDO article = articleRepository.findById(param.getArticleId()).orElseThrow(() -> {
return failException(FailCodeConstant.Article.NOT_EXISTED, "文章不存在");
});
CommentDO parentComment = null;
String mailReceiver = null;
if (param.getParentId() != null) {
parentComment = commentRepository.findById(param.getParentId()).orElseThrow(() -> {
return failException(FailCodeConstant.Comment.PARENT_NOT_EXISTED, "上级评论不存在");
});
if (!article.getId().equals(parentComment.getArticleId())) {
fail(FailCodeConstant.Comment.PARENT_DO_NOT_BELONG_TO_ARTICLE, "上级评论不属于该文章");
}
mailReceiver = parentComment.getEmail();
}
CommentDO comment = new CommentDO();
comment.setArticleId(article.getId());
if (parentComment != null) {
comment.setRootId(parentComment.getRootId() == null ? parentComment.getId() : parentComment.getRootId());
comment.setParentId(parentComment.getId());
}
comment.setFromAuthor(param.getFromAuthor());
comment.setEmail(param.getEmail());
comment.setContent(param.getContent());
comment.setGmtCreate(new Date());
commentRepository.save(comment);
try {
if (mailReceiver != null && !mailReceiver.equals(param.getEmail())) {
Map<String, Object> emailArgs = new HashMap<>();
emailArgs.put("articleTitle", article.getTitle());
String articleUrl = articleHelper.getRequestUrl(article);
emailArgs.put("articleUrl", articleUrl);
emailArgs.put("replyContent", comment.getContent());
emailArgs.put("replyUrl", articleUrl + "#comment-" + comment.getId());
QMailMessage qMailMessage = QMailMessage.from(blogProperties.getServiceEmail()).to(mailReceiver)
.subject(String.format("您在博客文章《%s》中的评论有了新的回复", article.getTitle()))
.template(TemplateConstant.Email.NEW_COMMENT, emailArgs);
qMailHelper.sendTemplate(qMailMessage);
}
} catch (Exception e) {
logger.error("新评论发送邮件失败", e);
}
CommentAddResult result = new CommentAddResult();
result.setId(comment.getId());
result.setFromAuthor(comment.getFromAuthor());
result.setContent(comment.getContent());
result.setGmtCreate(comment.getGmtCreate());
return result;
}
}
在 CommentService 类中,getTree 方法返回的结果是一个树形的评论列表,每条评论都可能有对应的子评论(即回复)。
add 方法除了保存当前新评论之外,还会给被回复的用户发送邮件提醒,用到的是我自己封装的 QMailHelper 类,这个类提供便捷的发送邮件接口,可以以同步或异步方式发送各种类型的邮件。在 add 方法中,我用这个类来发送模板邮件,需要在 templates/email 目录中定义一个Thymeleaf模板文件 newComment.html,其中的代码如下:
<div th:object="${args}">
您在博客文章《<a th:text="*{articleTitle}" th:href="*{articleUrl}"></a>》中的评论有了新的回复:<br>
<a th:text="*{replyContent}" th:href="*{replyUrl}"></a><br>
快去查看吧
</div>
第108行在 QMailMessage 对象中通过 template(String template, Object templateArgs) 方法指定模板文件及参数,然后第109行通过 QMailHelper 的 sendTemplate(QMailMessage qMailMessage) 方法即可将模板文件渲染成HTML并发送。
在后端开发/项目结构调整 中,我在 src/main/resources 目录中创建了 static、templates 目录,这两个目录是前端开发过程中需要用到的。因为主要用HBuilder X来进行前端开发,所以我需要先在HBuilder X中导入 src/main/resources 这个目录:
其中除了 static、templates 这两个目录以外,其他文件和目录在前端开发中都不会用到。
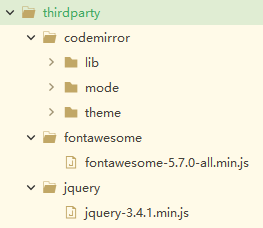
在技术和工具选型 中提到了前端中需要用到jQuery、Font Awesome、CodeMirror这些第三方的库,所以在开发之前我需要先把它们引入到项目中。具体地,需要分别从官网上下载它们的源代码到本地,然后在 static/thirdparty 中为每个库新建相应的目录,并把下载下来的代码放到对应目录中:
由于在后面的开发中我会在其他.js文件中用到jQuery的很多方法,所以我需要自己将jQuery包装成独立的ES6模块,方便后续把jQuery以模块的形式引入到项目中,所以我还需要在 static/script/common 目录中新建一个 jquery.module.js 文件,其中代码如下:
import '../../thirdparty/jquery/jquery-3.4.1.min.js';
export default jQuery.noConflict(true);
这个文件中用到了jQuery的noConflict方法,这个方法可以释放对$符号的控制,然后返回一个对jQuery的引用,通过export命令,这个引用就能方便地被其他模块使用了。
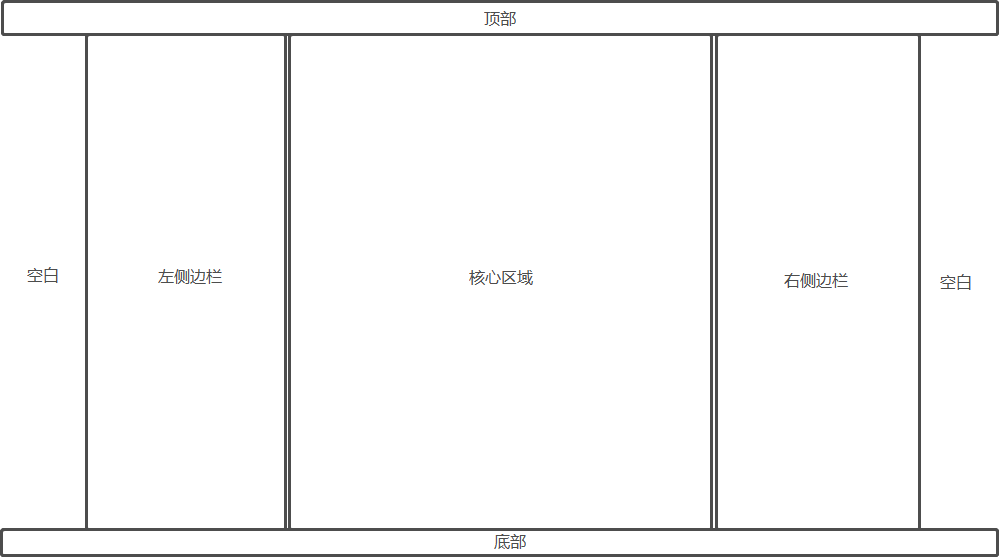
博客网站最核心的部分就是文章页面,本次也只开发这一个页面。文章页面主体使用三列布局,加上顶部和底部,构成以下结构:
其中顶部主要展示网站logo以及导航等,底部主要展示网站版权和备案信息,左侧边栏主要展示文章目录,右侧边栏准备在未来展示一些热门文章列表、相关文章列表等,中间的核心区域就是展示文章内容以及文章评论的区域。基于这个布局结构图,我需要在 templates 目录下新建一个 article.html 文件,然后加入以下代码:
<!DOCTYPE html>
<html>
<head>
<meta charset="utf-8" />
<title>文章标题 - 网站名</title>
</head>
<body>
<header></header>
<div id="page-body">
<aside id="page-left-aside"></aside>
<main>
<article id="article" class="page-body-module"></article>
<div id="comments" class="page-body-module"></div>
</main>
<aside id="page-right-aside"></aside>
</div>
<footer></footer>
</body>
</html>
上面代码先简单按照页面结构图划分好了页面布局,然后需要在 static/style 目录中新建一个 article.css 文件,在其中添加一些控制页面布局的样式,最后在 article.html 中链接这个样式文件:
<link rel="stylesheet" type="text/css" th:href="@{/static/style/article.css}" href="../static/style/article.css" />
这个标签上的 href 属性主要用在开发过程中,使.html文件可以直接通过相对路径引用对应的资源。而 th: 开头的属性是Thymeleaf的属性,在经过模板引擎渲染后,会直接替换对应的属性,所以上面的 href 的值就会被替换成 @{...} 所对应的路径。这个主要是解决不同环境的资源路径不一致的问题。
由于网站的不同页面基本都需要展示顶部和底部,并且这两个页面模块内容及样式基本固定,所以我就先开发这两个通用的页面模块,然后再把它们引入到其他页面中。
顶部模块主要包括一段DOM,及其对应的style和script,需要新建以下文件:
在 templates/common 目录中新建一个 header.html
在 static/style/common 目录中新建一个 header.css
在 static/script/common 目录中新建一个 header.js
然后在 header.html 中加入代码:
<link rel="stylesheet" type="text/css" th:href="@{/static/style/common/header.css}" href="../../static/style/common/header.css" />
<header>
<nav>
<ul>
<li class="header-nav-item">
<a href="/" title="Home">
<div class="header-nav-item-icon">
<i class="fas fa-home fa-fw"></i>
</div>
<div class="header-nav-item-name">
Home
</div>
</a>
</li>
<li class="header-nav-item">
<a href="/blog/" title="Blog">
<div class="header-nav-item-icon">
<i class="fas fa-blog fa-fw"></i>
</div>
<div class="header-nav-item-name">
Blog
</div>
</a>
</li>
</ul>
</nav>
</header>
<script th:src="@{/static/script/common/header.js}" src="../../static/script/common/header.js" type="module" charset="utf-8"></script>
其中,带有 fas 类名的 i 标签是Font Awesome中的图标,fa-home、fa-blog 用来指定图标名称。
接下来在 header.css 中加入样式代码:
body>header {
position: sticky;
top: 0;
background-color: white;
box-shadow: 0 0 0.25rem gray;
z-index: 100000;
}
body>header>nav>ul {
display: flex;
margin: 0;
padding: 0;
list-style: none;
}
.header-nav-item:hover {
background-color: deepskyblue;
color: white;
}
.header-nav-item>a {
display: block;
padding: 0.5rem 0.875rem;
text-align: center;
text-decoration: none;
color: inherit;
}
a.q-anchor {
display: block;
height: 3.75rem;
margin-top: -3.75rem;
}
由于顶部会始终悬浮在窗口顶端,所以点击页面内部链接跳转到锚点时,会导致锚点附近的一部分内容被顶部栏遮挡,因此需要修改锚点的位置。第25到29行表示,凡是加了 q-anchor 类名的 a 锚点,都将锚点的实际位置上移一定高度,这样跳转到锚点时,锚点下面的内容才会正常显示在顶部栏下方,不被遮挡。
最后在 header.js 中加入脚本代码:
import $ from './jquery.module.js';
import {
QListener
} from '../q/q-module.js';
class QPageHeader {
constructor() {
this.$header = $('body>header');
this.onHeightChangeCallbacks = [];
QListener.onChange(() => this.height(), (newValue, oldValue) => {
this.onHeightChangeCallbacks.forEach((callback) => {
callback(newValue, oldValue);
});
});
const windowScrollListener = () => {
const scrollTop = $(document).scrollTop();
if (scrollTop >= this.height()) {
this.$header.find('.header-nav-item-name').hide();
} else if (scrollTop <= 0) {
this.$header.find('.header-nav-item-name').show();
}
};
windowScrollListener();
$(window).scroll(windowScrollListener);
}
height() {
return this.$header.outerHeight();
}
onHeightChange(callback) {
this.onHeightChangeCallbacks.push(callback);
}
}
export default new QPageHeader();
脚本中引用了 static/script/q 目录下的 q-module.js 文件,这个文件里是我自己定义的一些前端常用模块。这里用到的 QListener 可以实现对自定义属性的监听,在上面例子中,第11行通过 QListener 监听顶部的高度变化,然后将变化前后的高度值作为参数,传给回调函数。
第26行的 $(window).scroll(windowScrollListener); 用来监听页面的滚动,然后控制顶部导航文字的隐藏和显示。
脚本最后一行返回一个 QPageHeader 的实例,方便其他模块调用该单例对象的方法。
顶部开发完成后,在 article.html 里的 header 标签上加入一个属性:
<header th:replace="common/header"></header>
加入这个属性后,Thymeleaf模板引擎渲染时会自动用 header.html 中的内容替换这个标签,完成顶部模块的引入。
底部模块的开发与顶部开发 类似,需要在对应目录新建 footer.html、footer.css、footer.js 文件:
footer.html 内容如下:
<link rel="stylesheet" type="text/css" th:href="@{/static/style/common/footer.css}" href="../../static/style/common/footer.css" />
<footer>
<i class="fas fa-copyright fa-fw"></i>
2020-2020
qzy.im
版权所有
<a href="http://www.beian.miit.gov.cn" target="_blank">ICP备案号</a>
</footer>
<script th:src="@{/static/script/common/footer.js}" src="../../static/script/common/footer.js" type="module" charset="utf-8"></script>
footer.css 内容如下:
body>footer {
position: sticky;
padding: 0.25rem 1.25rem;
bottom: 0;
background-color: white;
box-shadow: 0 0 0.25rem gray;
z-index: 100000;
text-align: center;
font-size: 0.875rem;
}
body>footer a {
text-decoration: none;
color: initial;
}
body>footer a:hover {
color: deepskyblue;
}
footer.js 内容如下:
import $ from './jquery.module.js';
import {
QListener
} from '../q/q-module.js';
class QPageFooter {
constructor() {
this.$footer = $('body>footer');
this.onHeightChangeCallbacks = [];
QListener.onChange(() => this.height(), (newValue, oldValue) => {
this.onHeightChangeCallbacks.forEach((callback) => {
callback(newValue, oldValue);
});
});
}
height() {
return this.$footer.outerHeight();
}
onHeightChange(callback) {
this.onHeightChangeCallbacks.push(callback);
}
}
export default new QPageFooter();
脚本最后一行返回一个 QPageFooter 的实例,方便其他模块调用该单例对象的方法。最后同样地,在 article.html 里的 footer 标签上加入一个属性来引入底部模块:
<footer th:replace="common/footer"></footer>
文章页面的开发,主要结合三种方式,分别针对页面上不同类型的内容:
对于文章的标题、时间、标签等基本不变的属性以及文章内容,需要通过Thymeleaf模板引擎渲染的方式直接渲染到.html文件里。
对于文章统计信息、评论等动态变化的后端数据,采取异步请求获取的方式。
对于文章目录等能够从页面其他部分提取出来的内容,直接通过脚本提取处理。
这样做的目的是将页面上需要展示的核心内容静态化、非核心内容动态化,也就是将用户和搜索引擎最感兴趣的内容优先展示。这样既有利于页面核心内容的快速加载,也有利于SEO,提高网站的搜索排名。
静态内容的渲染由于用到了Thymeleaf,所以需要后端共同来完成。首先是前端部分需要在 article.html 中进行以下修改:
在 html 标签上加入属性 th:object="${article}"
在 title 标签上加入属性 th:text="|*{title} - 郄郄私语|"
在 article 标签上加入属性 th:data-id="*{id}"
最后在 article 标签内加入以下代码:
<h1 id="title">
<a th:name="*{title}" class="q-anchor q-heading-anchor"></a>
<span th:text="*{title}">文章标题</span>
</h1>
<div id="english-title" th:text="*{englishTitle}">Article English Title</div>
<div id="info-area">
<span class="info" title="作者">
<i class="fas fa-user-alt fa-fw"></i>
<span>郄正元</span>
</span>
<span class="info" title="发布时间">
<i class="fas fa-calendar-alt fa-fw"></i>
<a th:text="${#dates.format(article.gmtCreate, 'yyyy-MM-dd HH:mm:ss')}">2000-01-01 00:00:00</a>
</span>
<span class="info" title="标签">
<i class="fas fa-tags fa-fw"></i>
<a class="tag" th:each="tag:*{tags}" th:text="${tag}">文章标签</a>
</span>
</div>
<div id="url-area">
本文链接:
<a th:href="*{url}" th:text="*{url}" th:title="|本文链接:*{url}|">文章链接</a>
</div>
<div id="content" th:utext="*{content}"></div>
然后,在后端完成静态页面生成的相关代码:
在 ArticleHelper 这个辅助类中新建一个方法 generateStaticPage:
@Autowired
private QWebRequestContext qWebRequestContext;
@Autowired
private TemplateEngine templateEngine;
public void generateStaticPage(ArticleDO article) {
WebContext context = new WebContext(qWebRequestContext.getRequest(), qWebRequestContext.getResponse(),
qWebRequestContext.getRequest().getServletContext());
context.setVariable("article", convertToStaticPageVO(article));
File file = new File(getStorePath(article));
file.getParentFile().mkdirs();
try (FileWriter fileWriter = new FileWriter(file)) {
templateEngine.process(TemplateConstant.ARTICLE, context, fileWriter);
} catch (IOException e) {
logger.error("文章静态页面生成失败", e);
fail(FailCodeConstant.Article.GENERATE_STATIC_PAGE_FAIL, "文章静态页面生成失败:" + article.getTitle());
}
}
这个方法通过 convertToStaticPageVO(article) 将一个文章的实体转换成模板页面 article.html 所需要的对象,然后渲染成最终的静态 .html 文件到指定目录中。其中,由于原始文章内容是用Typora写成并导出成 .html 文件的,所以该方法中需要将文章的内容从原始文件中读取出来,加以处理后才会生成最终的文章内容,并渲染到 article.html 中 id="content" 的位置,读取及处理的方法如下:
private String getContent(ArticleDO article) {
Document document = null;
try {
document = Jsoup.parse(new File(article.getContentFile()), "UTF-8");
} catch (IOException e) {
logger.error("文章内容读取失败", e);
fail(FailCodeConstant.Article.CONTENT_FILE_READ_FAIL, "文章内容读取失败:" + article.getTitle());
}
Element body = document.body();
body.select("script,style,h1").remove();
body.select("pre.md-fences").forEach((element) -> {
String language = element.attr("lang");
List<String> codeLines = element.select(".CodeMirror-line").stream().map(Element::wholeText)
.collect(Collectors.toList());
String code = String.join("\r\n", codeLines).replaceAll("\u200b", "");
Element qCode = new Element(TAG_MAP.get("q-code"), "");
qCode.attr("language", language);
qCode.text(code);
element.replaceWith(qCode);
});
body.select("a.md-header-anchor").forEach((element) -> {
element.removeClass("md-header-anchor").addClass("q-anchor q-heading-anchor");
});
String urlTitle = getUrlTitle(article);
body.select("img").forEach((element) -> {
element.removeAttr("alt");
String src = element.attr("src");
element.attr("src", urlTitle + "/assets/" + replaceAssetName(Paths.get(src)).getFileName().toString());
});
return body.html();
}
该方法第2到8行,是通过Jsoup从Typora导出的原始文件中读取出HTML;第10行将其中的 body 部分取出;第11行移除其中的脚本、样式以及文章标题;第12到22行将文章内容中被CodeMirror预处理的代码还原,并放入到我自定义的 q-code 标签中,目的是在最终生成的 .html 文件中只保留原始的代码,然后在前端再通过CodeMirror去处理;第23到25行将文章内容中的标题锚点加上我自定义的类名 q-anchor 和 q-heading-anchor,方便前端生成目录;第27到32行处理文章所引用的图片的路径。该方法处理之后最终返回一段包含文章内容的干净的字符串,其中无意义的部分都被去除了。
然后在 ArticleService 中调用 ArticleHelper 中的 generateStaticPage 方法为所有文章生成静态页面:
public void generateStaticPages() {
articleRepository.findAll().forEach((article) -> {
articleHelper.generateStaticPage(article);
});
}
在 ArticleController 中添加一个接口 article/generateStaticPages,方便自己能够手动生成静态页面:
@PostMapping("generateStaticPages")
public void generateStaticPages() {
articleService.generateStaticPages();
}
首先,在页面上增加文章统计信息,需要在 id="info-area" 的 div 标签尾部增加以下代码:
<span q-template="statisticsInfoArea">
<span class="info" title="阅读数">
<i class="fas fa-eye fa-fw"></i>
<span>${viewCount}</span>
</span>
<span class="info" title="评论数">
<i class="fas fa-comment-dots fa-fw"></i>
<a href="#comments">${commentCount}</a>
</span>
</span>
其中 q-template 是我自己定义的一个属性,表明该标签及标签内的内容是一个DOM模板,该属性的值就是模板名称。在我自己定义的前端模块包 static/script/q/q-module.js 中有一个模块 QTemplate,该模块能够渲染DOM模板,并自动计算并替换其中被 ${} 包裹的表达式的值。
然后在 static/script 目录中新建一个文件 article.js,在其中加入代码:
import $ from './common/jquery.module.js';
import {
QTemplate,
QApi,
} from './q/q-module.js';
const articleId = $('#article').data('id');
QApi.post('article/view', {
id: articleId
});
QTemplate.renderFromApi({
templateName: 'statisticsInfoArea',
url: 'article/getStatisticsInfo',
param: {
id: articleId
}
});
上面代码第8到10行会请求后端接口 article/view,记录文章查看数。QApi 是我自己封装的接口请求模块。
第11到17行通过 QTemplate.renderFromApi 方法请求后端接口 article/getStatisticsInfo,获取响应数据并渲染到 templateName 所指定的DOM模板中。
接下来获取评论数据,首先在 id="comments" 的 div 标签内添加如下代码:
<div class="page-body-module-title">
文章评论
</div>
<div id="no-comment">
暂无评论...
</div>
<div id="comment-tree">
<div id="comment-${id}" class="comment" data-id="${id}" q-template="comment">
<span>${fromAuthor ? '郄正元' : '游客'}</span>
<span class="comment-from-author" q-template-remove="${!fromAuthor}">作者</span>
<span class="comment-time">${gmtCreate}</span>
<div class="comment-content">${content}</div>
<div class="comment-operate">
<span class="reply-comment" title="回复数">
<i class="fas fa-reply"></i>
<span>${subList.length}</span>
</span>
</div>
<div class="comment-replies"></div>
</div>
</div>
其中 q-template-remove 属性表示在渲染时,如果属性值为 true,就移除该属性所在标签。
然后在 article.js 中添加以下代码:
const initComments = async () => {
const renderComment = (item) => {
const $comment = QTemplate.render({
templateName: 'comment',
scope: item
});
const $subCommentContainer = $comment.children('.comment-replies');
$subCommentContainer.append(renderComments(item.subList));
return $comment;
};
const renderComments = (list) => {
return list.sort((a, b) => {
return b.id - a.id;
}).map(renderComment);
};
const data = await QApi.get('comment/getTree', {
articleId
});
if (data.list.length <= 0) {
return;
}
$('#comment-tree').append(renderComments(data.list)).show();
$('#no-comment').hide();
};
initComments();
上面的代码也利用了 QApi 和 QTemplate 模块完成评论数据的获取和渲染工作。
为了让用户在阅读文章时能够清晰地看到文章的内容结构,我需要在页面上根据文章内容来生成文章目录,并且允许用户点击目录直接跳到对应章节。
首先,在 id="page-left-aside" 的 aside 标签内加入以下代码:
<div id="catalogs" class="page-body-module">
<div class="page-body-module-title">
文章目录
</div>
</div>
然后在 article.js 中添加以下代码:
const initCatalogs = () => {
for (let anchor of $('.q-heading-anchor')) {
const $anchor = $(anchor);
const anchorName = $anchor.attr('name');
const headingName = $anchor.parent().text();
const headingLevel = $anchor.parent()[0].tagName.toLowerCase();
if (headingLevel == 'h1') {
$('#catalogs').append(SafeRenderer.forHtml `<div class="catalog catalog-${headingLevel}">${headingName}</div>`);
} else {
$('#catalogs').append(SafeRenderer.forHtml `
<div class="catalog catalog-${headingLevel}" name="${anchorName}">
<a href="#${anchorName}">${headingName}</a>
</div>
`);
}
}
const catalogsAdjust = () => {
const top = QPageHeader.height() +
parseFloat($('#catalogs').css('margin-top')) +
parseFloat($('#page-body').css('padding-top'));
const bottom = QPageFooter.height() +
parseFloat($('#catalogs').css('margin-bottom')) +
parseFloat($('#page-body').css('padding-bottom'));
$('#catalogs').css({
top,
'max-height': $(window).height() - top - bottom,
});
};
QPageHeader.onHeightChange(catalogsAdjust);
QPageFooter.onHeightChange(catalogsAdjust);
$(window).resize(catalogsAdjust);
catalogsAdjust();
};
initCatalogs();
上面代码的第2到16行,会找到文章中所有标题(包括各节小标题)对应的锚点,然后创建一个对应的超链接,插入到目录中,让用户能够点击目录直接跳到对应章节。
第18到33行,目的是控制目录区域永远在页面顶部栏和底部栏之间,高度自适应。另外还需要在 article.css 中控制其样式:
#catalogs {
position: sticky;
box-sizing: border-box;
overflow-y: auto;
}
结合上面的样式,目录区域就能永远保持在页面可视区域内,不随页面滚动。如果目录条数过多,则自动在y轴方向显示滚动条,保证随时都能查看所有目录。
接下来,由于经过静态内容渲染 之后的页面上的代码部分都是没有经过格式化和着色的,所以我还需要使用CodeMirror来处理文章中的代码部分。首先在 article.html 中引入CodeMirror相关的样式和脚本:
<link rel="stylesheet" type="text/css" th:href="@{/static/thirdparty/codemirror/lib/codemirror.css}" href="../static/thirdparty/codemirror/lib/codemirror.css" />
<script th:src="@{/static/thirdparty/codemirror/lib/codemirror.js}" src="../static/thirdparty/codemirror/lib/codemirror.js" type="text/javascript" charset="utf-8"></script>
<script th:src="@{/static/thirdparty/codemirror/mode/meta.js}" src="../static/thirdparty/codemirror/mode/meta.js" type="text/javascript" charset="utf-8"></script>
然后在 article.js 中加入以下代码:
const initCodeAreas = () => {
for (let codeArea of $('q-code')) {
const $codeArea = $(codeArea);
const language = $codeArea.attr('language');
const modeInfo = CodeMirror.findModeByName(language);
if (!modeInfo) {
continue;
}
const modeName = modeInfo.mode;
QStaticResources.loadScript(
`thirdparty/codemirror/mode/${modeName}/${modeName}.js`);
const codeString = $codeArea.text();
$codeArea.text('');
CodeMirror(codeArea, {
mode: modeInfo.mime,
value: codeString,
lineNumbers: true,
lineWrapping: true,
readOnly: true,
});
}
};
initCodeAreas();
上面的代码会遍历所有的 q-code 标签所表示的代码区域,然后获取标签上的 language 属性,并通过CodeMirror提供的方法 findModeByName 找到代码所用语言。然后第10行通过我在 q-module.js 中自定义的 QStaticResources 模块将对应语言的处理脚本动态地加载到页面中,最后通过CodeMirror对代码区域进行处理。
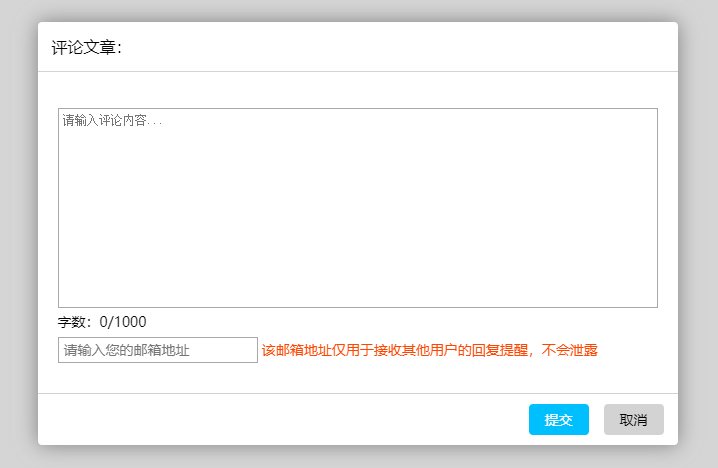
评论功能首先需要为用户提供一个能够发表评论的模态框,在 article.html 中的 footer 标签之后加入以下代码:
<div id="comment-area" q-template="commentArea">
<div q-template-remove="${commentToArticle}">
<i class="fas fa-quote-left"></i>
<div id="parent-comment-content">${commentToArticle ? '' : parentContent}</div>
<i class="fas fa-quote-right fa-pull-right"></i>
</div>
<textarea id="comment-content" placeholder="${commentToArticle ? '请输入评论内容...' : '请输入回复内容...'}"></textarea>
<div id="comment-word-count-area">
字数:<span id="comment-word-count">0</span>/${maxCommentLength}
</div>
<div>
<input id="comment-email" type="text" placeholder="请输入您的邮箱地址" />
<span id="comment-email-hint">该邮箱地址仅用于接收其他用户的回复提醒,不会泄露</span>
</div>
</div>
最外层标签上的属性 q-template="commentArea" 表示该标签也是一段DOM模板。然后在 article.js 中创建一个方法:
const showCommentArea = async ({
commentToArticle = true,
parentComment = {},
$newCommentContainer
}) => {
const $commentArea = QTemplate.render({
templateName: 'commentArea',
scope: {
maxCommentLength: QConfig.MAX_COMMENT_LENGTH,
commentToArticle,
parentContent: parentComment.content,
}
});
const $commentContent = $commentArea.find('#comment-content');
$commentContent.on('input propertychange', () => {
const commentLength = $commentContent.val().length;
$commentArea.find('#comment-word-count').text(commentLength);
});
const modal = new QModal({
name: 'commentArea',
title: commentToArticle ? '评论文章:' : '回复评论:',
autoWidth: true,
confirmButtonText: '提交'
});
modal.setBodyDom($commentArea);
await modal.open({
onConfirm: async (resolve) => {
const content = $commentContent.val();
if (content.trim().length <= 0) {
await QAlert('评论内容不能为空');
$commentContent.focus();
return;
}
const commentLength = content.length;
if (commentLength > QConfig.MAX_COMMENT_LENGTH) {
await QAlert('评论内容字数过多,请精简内容');
$commentContent.focus();
return;
}
if (!await QConfirm('确认提交该评论?')) {
return;
}
const data = await QLoading.surround('正在提交,请稍等...', async () => {
return await QApi.post('comment/add', {
articleId,
parentId: parentComment.id,
content,
email: $commentArea.find('#comment-email').val()
});
});
if (!data) {
return;
}
data.subList = [];
$newCommentContainer.prepend(renderComment(data));
window.location.hash = `comment-${data.id}`;
resolve(true);
},
onCancel: async (resolve) => {
if ($commentContent.val().length > 0 && !await QConfirm('确认关闭吗?已输入的内容将会丢失')) {
return;
}
resolve(false);
}
});
modal.close();
};
该方法用来显示发表评论的区域。其中第6到13行使用 QTemplate 模块将名称为 commentArea 的DOM模板渲染成一个jQuery对象;第20到26行通过我在 q-module.js 中定义的 QModal 模块创建出一个模态框来,并将前面渲染出的jQuery对象放入模态框中;第28行打开这个模态框:
其中 onConfirm 和 onCancel 方法分别处理模态框的确认和取消事件。用户点击“提交”按钮,调用 onConfirm 方法,经过第30到45行的校验之后,第47到54行向后端提交评论,获取返回数据,然后第60到61行会将新发表的这条评论渲染并添加到评论列表中,最后让页面跳转到该评论。
接下来,为了让用户能在阅读文章过程中随时发表自己的评论,我需要在页面上做一个悬浮的发表评论的按钮。在 article.html 中 id="page-right-aside" 的 aside 标签内加入以下代码:
<div id="article-operations" class="page-body-module">
<span id="comment-article" title="评论"><i class="fas fa-comment-dots fa-fw"></i></span>
<span id="to-article-top" title="回到顶部">
<span class="fa-layers fa-fw">
<i class="fas fa-arrow-up fa-fw" data-fa-transform="down-1 shrink-1"></i>
<i class="fas fa-slash fa-fw" data-fa-transform="up-7 rotate--37.7 shrink-5"></i>
</span>
</span>
</div>
这里顺便加入了一个“回到顶部”的按钮,然后在 article.js 中加入以下代码:
const initArticleOperations = () => {
$('#comment-article').on('click', () => {
showCommentArea({
$newCommentContainer: $('#comment-tree'),
});
});
$('#to-article-top').on('click', () => {
$(document).scrollTop(0);
});
const operationsAdjust = () => {
const bottom = QPageFooter.height() +
parseFloat($('#article-operations').css('margin-bottom')) +
parseFloat($('#page-body').css('padding-bottom'));
$('#article-operations').css({
top: Math.min(550, $(window).height() - bottom - $('#article-operations').outerHeight()),
});
};
QPageFooter.onHeightChange(operationsAdjust);
$(window).resize(operationsAdjust);
operationsAdjust();
};
initArticleOperations();
其中,第11到21行是为了保证这些操作按钮永远在窗口可视区域内(#article-operations 需要有一个样式控制其位置:position: sticky;)。
第2到6行在用户点击“评论”按钮时,就可以调用上面定义的 showCommentArea 方法打开发表评论的模态框。
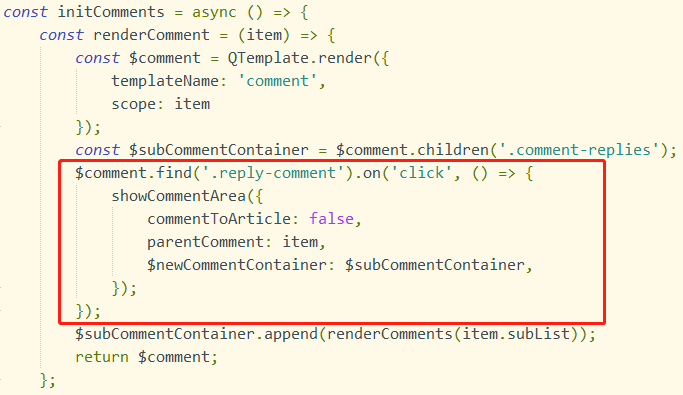
最后,还需要增加回复评论的功能,让用户能够在别人的评论下发表回复。这里只需要在文章页面开发/动态数据获取 中提到的加载评论的方法 initComments 中添加回复功能即可:
回复评论同样是调用了上面定义的 showCommentArea 方法来完成的。
完成了博客开发,并且对接口和页面都进行了测试以后,接下来就可以将博客部署到服务器上了。
后端的部署首先需要在服务器数据库中创建一个新的数据库 blog,然后完善项目配置文件,在 application-prod.properties 中添加以下配置:
spring.datasource.driver-class-name=com.mysql.cj.jdbc.Driver
spring.datasource.url=jdbc:mysql://localhost:3306/blog?characterEncoding=UTF-8
spring.datasource.username=<数据库用户名>
spring.datasource.password=<数据库密码>
logging.file.path=<日志文件目录>
logging.level.root=INFO
server.servlet.context-path=/blog
blog.static-article-dir=<静态文章目录>
其中,“静态文章目录”用于存放Thymeleaf预渲染后的文章页面及其附件。
接下来进行打包,由于开发和测试过程/后端开发/项目结构调整 中提到了在项目结构中包含了两个和后端没有关系的文件夹 rawArticles 和 static,因此在Maven打包时需要将这两个资源文件夹排除。在 pom.xml 中的 plugins 中添加以下配置:
<plugin>
<groupId>org.apache.maven.plugins</groupId>
<artifactId>maven-jar-plugin</artifactId>
<configuration>
<excludes>
<exclude>rawArticles/**</exclude>
<exclude>static/**</exclude>
</excludes>
</configuration>
</plugin>
然后在 pom.xml 所在目录中执行命令 mvn clean package 即可在 target 目录中生成打包文件 blog-0.0.1-SNAPSHOT.jar。
接下来,通过FileZilla将jar包上传到服务器上的指定目录,然后用PuTTY登录服务器,并进入jar包所在目录执行命令:
nohup java -jar blog-0.0.1-SNAPSHOT.jar --spring.profiles.active=prod > /dev/null &
该命令会激活prod配置文件并在后台运行jar包,最后通过 ps -ef | grep java 命令查看进程或者进入日志文件目录查看程序日志,即可查看服务运行状态。
前端部署比较简单,由于都是静态资源,因此直接将 src/main/resources/static 目录通过FileZilla上传到服务器上的指定位置即可。
前后端部署完成后,我需要通过Nginx将前后端服务发布到服务器上,并提供通过域名的https访问。只需要在Nginx的配置文件中添加以下配置:
server {
listen 80;
server_name qzy.im www.qzy.im;
rewrite ^(.*)$ https://qzy.im$1 permanent;
}
server {
listen 443;
server_name qzy.im www.qzy.im;
if ($host = 'www.qzy.im') {
rewrite ^(.*)$ https://qzy.im$1 permanent;
}
ssl on;
ssl_certificate <ssl证书的.pem文件路径>;
ssl_certificate_key <ssl证书的.key文件路径>;
ssl_session_timeout 5m;
ssl_ciphers ECDHE-RSA-AES128-GCM-SHA256:ECDHE:ECDH:AES:HIGH:!NULL:!aNULL:!MD5:!ADH:!RC4;
ssl_protocols TLSv1 TLSv1.1 TLSv1.2;
ssl_prefer_server_ciphers on;
location /blog/ {
alias "<静态文章目录>";
}
location /blog/static/ {
alias "<前端静态资源目录>";
}
location /blog/interface/ {
proxy_set_header Host $host:$server_port;
proxy_pass http://localhost:8080/blog/;
proxy_set_header Cookie $http_cookie;
proxy_set_header X-Real-IP $remote_addr;
proxy_set_header REMOTE-HOST $remote_addr;
proxy_set_header X-Forwarded-For $proxy_add_x_forwarded_for;
proxy_set_header X-Forwarded-Proto $scheme;
}
}
其中,第1到5行用来监听对 qzy.im 和 www.qzy.im 域名的http请求,然后将其永久重定向到 https://qzy.im 上;第11到13行拦截对 www.qzy.im 的https请求,然后将其永久重定向到 https://qzy.im 上。这样做的目的是将所有的流量都集中到 https://qzy.im 上,能更好的提高网站的排名。
接下来,第15到21行用来提供ssl安全验证,使网站能通过https方式访问,更加安全可信。
最后是路径映射,第23到25行会将/blog/路径下的链接映射到静态文章目录中(参考后端部署 );第27到29行会将/blog/static/路径下的静态资源请求链接映射到前端静态资源目录中(参考前端部署 );第31到39行会将/blog/interface/路径下的接口请求链接反向代理到后端java服务中(参考后端部署 )。
完成以上配置并启动Nginx服务后,个人博客就发布成功了,接下来就可以开始愉快的写文章了✌
由于文章编写使用的是Markdown语言及Typora软件,产生的原文件是 .md 文件,为了发布到网站上,我还需要做一些处理工作。
以本文的发布为例,首先,我需要使用Typora软件编写好文章,然后使用软件自带的导出功能将文章导出成 .html 文件,原 .md 文件和导出后的 .html 都在 src/main/resources/rawArticles 目录中。然后使用FileZilla将 rawArticles 目录上传到服务器上。
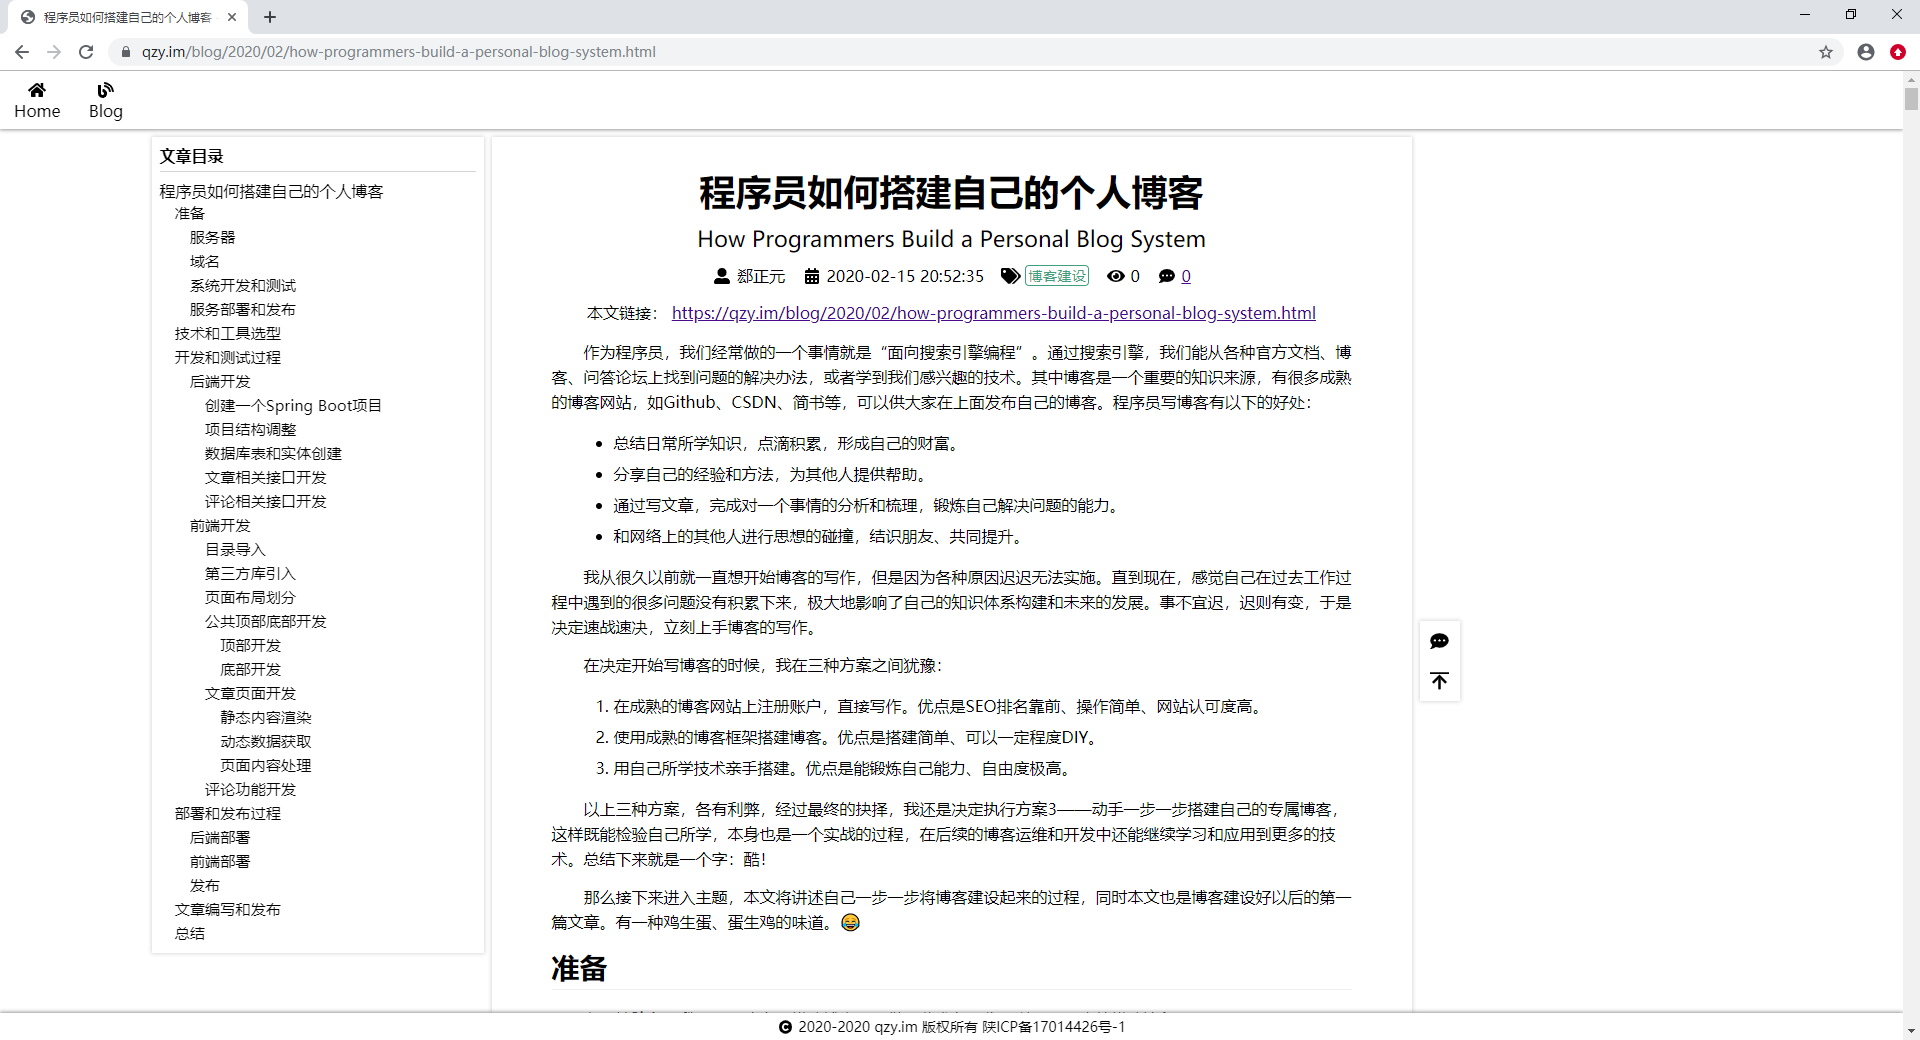
由于Typora导出的文件是独立的文章页面,其中包含很多无意义的标签及样式,无法直接嵌入到我的博客页面中,所以我还需要对原始的文章 .html 页面进行解析和渲染,生成静态文章 .html 文件,解析和渲染过程在开发和测试过程/前端开发/文章页面开发/静态内容渲染 中已经提到。我需要先用MySQL Workbench连接服务器上的数据库,在 article 表中插入一条记录:
然后调用 ArticleController 中的 generateStaticPages 接口即可将文章渲染成静态 .html 文件到静态文章目录中,最后即可通过链接访问该文章。文章发布后最终展示效果如下:
到此为止个人博客的搭建总算大功告成!总结一下整个过程中的一些心得体会:
自己亲手一步一步搭建博客是一个耗时耗力的工作,相比文章开头提到的其他创建博客的方案来说不是特别经济划算。所以如果真的想要快速上手写博客,就可以考虑其他方案。但是经过从开发测试到部署发布这一系列工作以后,得到一个属于自己的博客是非常有成就感的,这一点会远胜于其他方案。
博客搭建的整个过程都在考验自己过去积累的技能和功底,需要用到很多以前在工作中或者平时积累下来的经验和工具。同时在这个过程中还能接触并学习到更多的知识,这些对自己以后的发展都是很有帮助的。
本次搭建只是完成了一个博客的雏形,使其具备了最基础的一些功能,未来需要完善的功能以及需要处理的问题还有很多,以后我会把博客建设的每一步变化和工作都以博客文章的方式记录下来。
最后,希望本文能够为看过这篇文章的网友,或者有亲手搭建博客想法的程序员们提供思路和帮助。同时也希望大家能够留下你们宝贵的意见和建议。感谢大家的阅读~